The trees in my neighbourhood
Module 5 - Plant a tree
Download the module 5 [PDF 693 KB]
Summary of Module 5
Students determine which tree species they wish to plant at the location they have selected based on various criteria.
They follow planting steps and fill out an experiment worksheet to consolidate what they have learned.
Cross-curricular competencies
- CCC1 - Use information
- CCC5 â Adopt efficient work methods
- CCC9 - Communicate appropriately
Subject area competencies
- SAC1 - Seek answers or solutions to scientific or technological problems: define a problem, choose an investigation or design scenario, carry out the procedure, conduct an experiment, analyze the results or solution
- SAC2 â Make the most of knowledge of science and technology: understand how technical objects work, understand natural phenomena
Objectives
- Choose the appropriate species as a function of the main characteristics of the local environment as well as certain objectives
- Learn to plant a tree
Contents
- Diversity of life: habitat, physical and behavioral adaptation
- Life-sustaining processes: photosynthesis and respiration
- General characteristics of the Earth: water
- Geological and geophysical phenomena: water cycle
Classroom organization
- As a group and in teams of 2 to 4 students
- Duration: one session of 45 minutes in the computer lab and one session of 60 minutes outdoors
Preparation
- Several weeks or months in advance of the project's starting date, evaluate the time and seasonal conditions these steps may require.
 - Make the necessary administrative arrangements (permits, if required; budget; etc.).
 - Evaluate soil texture and drainage at the location selected for tree planting, if this has not been done previously (see Module 4).
 - Contact several garden centres to determine which indigenous tree species could be suitable for planting, based on the soil characteristics of the location selected for planting (schoolyard, private property, etc.) , inventory and cost.
 - Reserve the computer lab for Activity 1.
 - If students filled out the identification and observation worksheets in Modules 1 and 2, ask them to bring them in (optional).
Â
- Note: Tree Canada offers a schoolyard greening program.
Sequence of activities for Module 5
- Activity 1 : Which species to choose? - 45 minutes - in the computer lab
Students determine which tree species to plant in the location selected. They use logical reasoning to arrive at their choice, taking into account both environmental factors (climate, soil texture, etc.) and human considerations.
 - Activity 2 : I plant a tree with my class - 60 minutes - outdoors
Students observe and participate in planting the tree they have chosen. They follow the protocol carefully, completing a fill-in-the-blank exercise.
Â
Activity 1 - Which species to choose?
Teacher Activity
Summary
Students determine which tree species to plant in the location selected.
They use logical reasoning to arrive at their choice, taking into account both environmental factors (climate, soil texture, etc.) and human considerations.
Classroom organization
45 minutes in the computer lab â as a group and in teams of 2 to 4 students
Material required
One computer station per team
Identification and observation worksheets filled out in Modules 1 and 2 (optional)
| Worksheet title | Contents | Quantity/User |
|---|---|---|
| Concepts | How to plant a tree? | 1 teacher |
| Experiment 1 | "Which species to choose?" questionnaire | 1 teacher and 1 per student |
Step-by-step procedures
- Announce that you and the class are going to plant a tree. Question students about the relationship of the tree to its environment and to humans (see preceding modules).
 - Distribute the Experiment 1 worksheet. Explain that the species must be selected as a function of the characteristics of the local environment and specific objectives (embellishment, fruit, biodiversity, etc.).
 - Ask students to reread the identification and observation worksheets they filled out during Modules 1 and 2 (optional).
 - Review the concepts of texture and soil drainage (Module 4) and introduce the notion of hardiness. Fill out questions 1 and 2 of the Experiment 1 worksheet.
 - Fill out question 3 of the Experiment 1 worksheet by conducting a search on the Internet. Suggest Internet research strategies to the students.
 - Compare results and agree on the objectives to be attained by completing question 4 as a group.
 - Ask students to conduct a search on preselected Internet websites for trees that correspond to the criteria identified. Fill out question 5.
 - Discuss the choice of tree species to plant, and ask students to evaluate the possibilities. Take into account the species available at the garden centre and within the budget.
Complete the Experiment 1 worksheet.

Activity 2 - I plant a tree with my class
Teacher Activity
Summary
Students observe and participate in planting the tree they have chosen. They follow the protocol carefully, completing a fill-in-the-blank exercise.
Classroom organization
60 minutes outdoors â as a group
Material required
The tree selected by the students
A stake
Non-calcareous gravel (not limestone)
Compost or earth
Mulch (ex.: bark chips)
Water (30 litres)
Fertilized mud (optional): fertilizer composed of earth and bovine manure (available at garden centres)
A spade
Pruning shears disinfected with 70% alcohol (to prevent transmission of disease)
| Worksheet title | Contents | Quantity/User |
|---|---|---|
| Concepts | How to plant a tree? | 1 teacher |
| Answer key 2 | Answer key to Experiment 2 worksheet | 1 teacher |
| Experiment 2 | Fill-in-the-blanks: "How to plant a tree" | 1 per student |
Step-by-step procedures
- Outdoors, explain that planting is a delicate operation and that careful planning is important. Ask students how they foresee the operation, and what the possible risks are for the tree. Distribute the Experiment 2 worksheet.
 - Plant the tree, following the instructions on the Concept worksheet. Ask students to participate. Students fill out the Experiment 2 worksheet, which is an observation sheet.
 - Back in the classroom, make up a schedule for tree care.
Teacher Concepts
How to plant a tree?
1. When to plant?
Deciduous trees will perform better if they are planted in the fall. In this way, the tree will have developed a better root system before the summer arrives, and will be less subject to drought. Conifers can be planted from very early in spring until June, or from August on. The tree will experience less stress if it is planted on a cool, cloudy day.
2. Preparing the ground
a. Dig a hole using a spade. A hole 1.5 times the height of the root ball is sufficiently deep, because most of the feeder roots are located at a depth of less than 1.3 m. Mix the first 20 cm of earth (backfill) with compost, and set this mixture aside.
b. Loosen the soil by scratching and cutting into the sides and bottom of the hole using the spade.
c. If it is clay soil that drains with difficulty, put a 20 cm-layer (approx.) of non-calcareous gravel (not limestone gravel) in the bottom of the hole.
d. If the soil texture is not right, amend it (improve it) following the instructions available on the Montreal Botanical Garden website.
(e.g.: mix part of the soil removed from the planting site in with earth).
3. Preparing the tree
a. Make sure the tree is outdoors, in the shade, to help prevent its roots from drying out. Wet the roots with some water if necessary (reserving 20 litres for later), and cover them with brown paper or burlap for protection, as required.
b. For a bare-root tree :
 i. Remove the protective burlap and untangle the roots.
   Cut off any damaged roots.
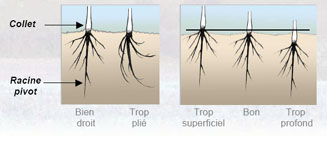
   Be careful not to cut off the taproot (primary root).
 ii. Dip the roots into the fertilized mud to coat them.
 4. Planting
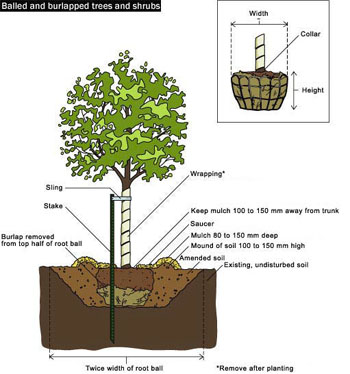
a. Place the tree into the hole and hold it so that the collar is at ground level.
b. Put the stake in place. Its main role is to stabilize the tree until its roots anchor it firmly in the soil.
c. Fill the hole with earth, gently rocking the tree from side to side to eliminate air pockets.
d. Cover the surface with the mixture of compost and the earth that was removed from the upper 20 cm of the hole (backfill).
e. Press the earth down lightly with your foot.
f. Pour 20 litres of water around the tree, allowing the water to sink into the soil before adding more if necessary.
g. Cover the ground around the tree with mulch.
5. Maintenance
a. Water regularly, according to the season: every three days during the first summer, otherwise once a week until the end of the tree's second year.
b. Replace the mulch once a year, to minimize weeds that can compete with the tree for nutrients (optional).
c. Pruning: prune deciduous trees slightly after planting, to reduce foliage and consequently the tree's water requirements.
The second year, prune the tree to a pleasing shape.
Consult the Pruning Leaflet from the Montreal Botanical Garden.
- Source: Planting trees and shrubs Leaflet, from the Montreal Botanical Garden Green Pages.
Teacher and Student Experiment 1
Which species to choose?
A tree is a living being that has a relationship with its environment. Choosing the right species is essential for a tree to thrive and fulfill its role.
Through this activity, you will discover how to choose the tree to plant with your class. As you go along, fill out the species selection chart at the end of this worksheet.
Consult the Internet to answer your questions.
Refer to the identification and observation worksheets you filled out, to help you choose the right species (optional).
1. Determine the texture and drainage properties of the soil. You identified these during the activity on soil (Sample A). Or write down the information provided by your teacher.
Texture: __________________________
Drainage: __________________________
2. Based on data found on the Internet, identify which plant hardiness zone you live in.
This zone is defined as a function of several criteria, the most important of which is the capacity of a plant to resist cold winter temperatures.
Consult the following Internet website: The Atlas of Canada.
Climate (or hardiness zone): ____________________
3. Based on your answers to questions 1 and 2, search on the Internet for six species whose requirements correspond to the environmental characteristics you identified.
Copy the names of these species onto line 1 of the species selection chart on page 3 of the worksheet.
Consult the Canada's Plant Hardiness Site - Going Beyond the Zones.
4. Identify the functions you wish your tree to fulfill (cross out the functions that do not apply in the left column of the chart):
a. Conifer or leafy tree: choose a conifer if, for example, you wish to green your winter landscape, and a leafy tree if you prefer shade in summer.
Conifer or deciduous tree: __________________________
b. Decorative tree: choose a fall color (as a function of the species selected during your observations, if appropriate).
Preferred color: __________________________
c. Tree that fosters animal biodiversity: give priority to an indigenous species with edible fruits that will attract birds (or rodents).
Tree with fleshy fruit or not: __________________________
d. Tree wind-break: choose a conifer if your intention is to protect a building from exposure to storms.
Tree wind-break or not: __________________________
e. Fruit tree: choose a fruit tree based on the fruit you hope to gather or pick.
Fruit tree or not: __________________________
5. Decide which of your six trees best corresponds to the criteria you identified in the preceding questions and through your search on the Internet. Fill out the rest of the species selection chart.
6. Suggest which tree to plant. (Base your choice on the results of your observations in Module 2, if appropriate.)
Choose a tree that is different from others at the planting site, to increase diversity.
Suggested tree species: __________________________
Justification: ______________________________________
| TREES | Species selection chart | ||||||
|---|---|---|---|---|---|---|---|
| 1 | Species |
n°1: _____ |
n°2: _____ |
n°3: _____ |
n°4: _____ |
n°5: _____ |
n°6: _____ |
| 2 |
Climate, texture and drainage | x | x | x | x | x | x |
| 3 | Conifer or leafy tree | Â | Â | Â | Â | Â | Â |
| 4 | Preferred color | Â | Â | Â | Â | Â | Â |
| 5 |
Increase in local animal diversity | Â | Â | Â | Â | Â | Â |
| 6 | Wind-break | Â | Â | Â | Â | Â | Â |
| 7 | Fruit tree  |  |  |  |  |  |  |
Student - Experiment 2
How to plant a tree?
The big day has arrived! Today you will plant a tree with your class. Follow the procedure closely, and fill in the missing words in the following text:
1. When to plant?
Deciduous trees will perform better if they are planted in the fall. In this way, the tree will have developed a better root system before the summer arrives, and will be less subject to drought.
Conifers can be planted from very early in ____________ until June, or from August on. The tree will experience less stress if it is planted on a ____________, ____________ day.
2. Preparing the ground
a. Dig a hole using a spade. A hole ____ times the height of the root ball is sufficiently deep, because most of the feeder roots are located at a depth of less than 1.3 m.
Mix the first 20 _______ of earth with compost, and set this mixture aside.
b. Loosen the soil by scratching and cutting into the sides and bottom of the hole using the spade.
c. If it is clay soil that drains with difficulty, put a 20 cm-layer (approx.) of non-calcareous ____________ (not limestone gravel) in the bottom of the hole.
d. If the soil texture is not right, amend it (improve it) following the instructions available on the Montreal Botanical Garden website.
(e.g.: mix part of the soil removed from the planting site in with earth).
3. Preparing the tree
a. CMake sure the tree is outdoors, in the shade, to help prevent its _________ from drying out.
Wet the roots if necessary with some of the water (reserving 20 litres for later), and cover them with brown paper or burlap for protection, as required.
b. For a bare-root tree:
i. Remove the protective burlap and untangle the roots. Cut off any damaged roots. Be careful not to ________ the taproot (primary root).
ii. Dip the roots into the fertilized mud to coat them.
4. Planting
a. Place the tree into the hole and hold it so that the collar is at ground level.
b. Put the stake in place. Its main role is to stabilize the tree until its roots anchor it firmly in the soil
c. Fill the hole with earth, gently rocking the tree from side to side to eliminate air pockets.
d. Cover the surface with the mixture of compost and the earth that was removed from the upper 20 cm of the hole (backfill).
e. Press the earth down lightly with your foot.
f. Pour 20 litres of water around the tree.
g. Cover the ground around the tree with mulch.
5. Maintenance
a. Water regularly, according to the season: every _____ days during the first summer, otherwise once a week until the end of the tree's second year.
b. Replace the mulch once a year, to minimize __________ that can compete with the tree for nutrients (optional).
c. Pruning: prune leafy trees slightly after planting, to reduce foliage and consequently the tree's _________ requirements. The second year, prune the tree to a pleasing shape.
Consult the Montreal Botanical Garden Website.
- Source: Planting trees and shrubs Leaflet , from the Montreal Botanical Garden Green Pages.
